
So this week I discovered that resource graph (by current favourite Azure tool) has a quite surprising limitation, what is this you ask?
Well if you have a reasonable size estate in Azure your resource count will very easily be in thousands - if you want to extract all of this as a report from resource graph you'll likely do this as a first pass in the resource graph console in the portal. You'll write the query and all the data is returned to the screen - everything looks good. You then decide to extract this to csv to do some more analysis in Excel - all looks good.
However what has silently failed is that not everything is extracted - in my tests the limit seemed to be 5000 items - anything above that is just not present the extract at all - but it doesn't error....
Now i couldn't find a mention of this exact limitation in the docs, however all of the various other API's into resource graph explicit mention limits and the need to make multiple fetches to return the entire dataset back.
So how to generate my nice excel extract with everything in?
Do multiple extracts in the GUI and then combine somehow?
What i actually decided to do was build something to generate a (full) report using some of the native PaaS components, this gives me the end result i want but also gives me the chance to make use of the tooling and teach myself some bits along the way.
Below is what i ended up building (still needs making a bit more user friendly I think but gets the job done), it taught me a lot of really useful stuff actually about how the components can be used and interact together. I've documented all those below and hopefully some of the explanation/tricks is useful for your use cases too.
So the basic flow of what I built is summarized in this screenshot from logic apps

To explain the 5 steps at a high level :
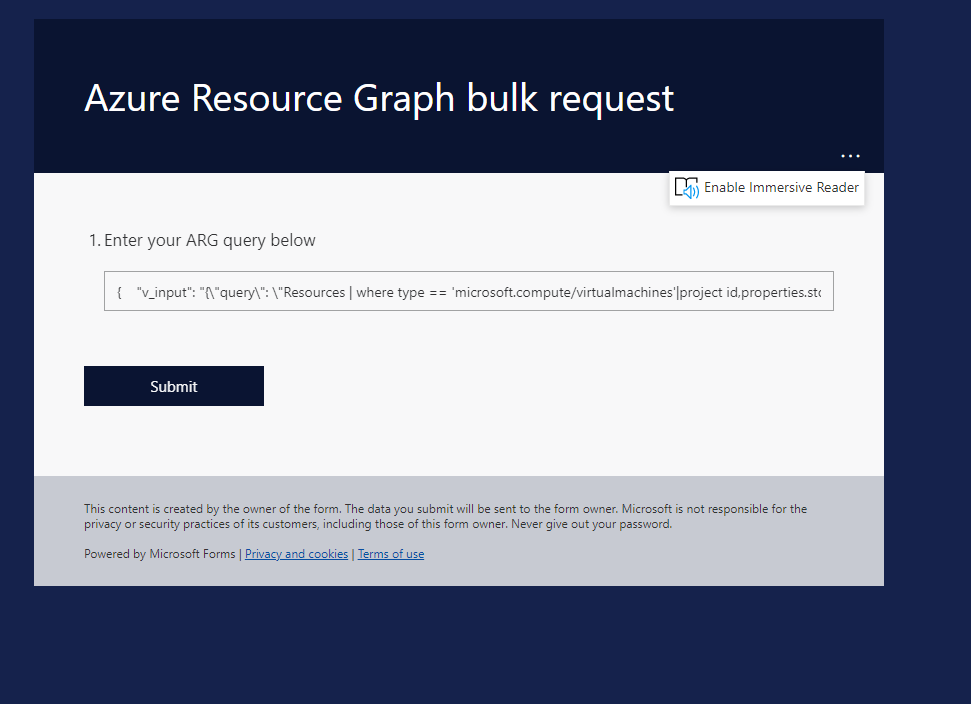
1) When a MS form is submitted (the form being the front end to submit the request in to my tool - I'll come on to that later)
2) Extract the specific element from the form that contains the resource graph query that I want to run
3) Call my function app code that is the main brains of the setup (and actually contains real code - albeit in PowerShell)
4) take the data and turn it into csv format
5) Email out the data as an attachment to an email
Now when i created this I actually started with point 3) and the bits to call it and send the results out came later. This is the part that caused me the most frustration (and taught me the most) so this is the bit I'll start off by explaining.
So lets go through creating the function app - the basic use case it answers it to receive a resource graph query and output the results (all of them)
Now the initial stage of this is exactly the same as one of my earlier explanations Serverless CMDB extract from Azure (dbaharrison.blogspot.com) - there is no point duplicating all of that - just stop at the point where I start adding in extra PowerShell modules and then continue from here on (make sure the managed identity part is done - that needs to be there to allow the function to query the data)
Now we need to create a new function - just be sure to make the trigger http and give it a name
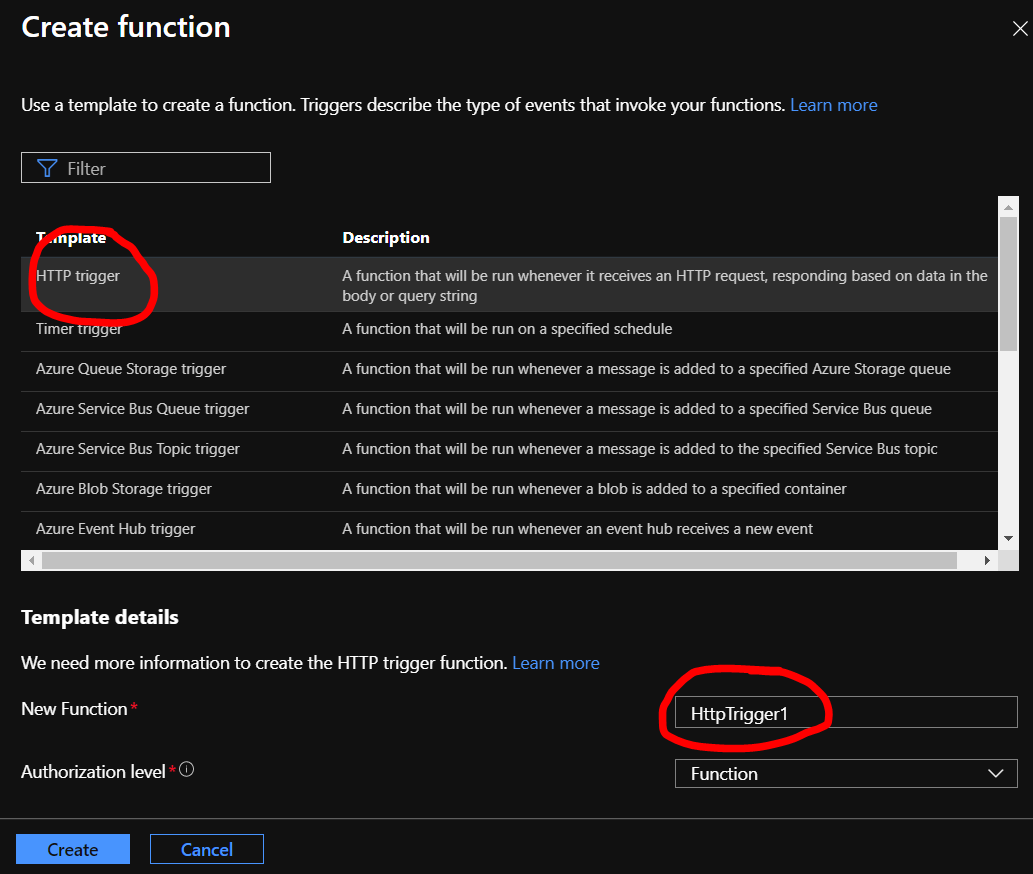
Once that's created we then need to paste in the magic code (that took way longer that it should of to develop) - I'll include that direct below and then explain some of the detail of why it's written like this.
Note there is some basic debug that can be removed and the whole thing could maybe do with a clean up - but the basics of what I need it to do are here - don't be too quick to judge :-)
using namespace System.Net

# Input bindings are passed in via param block.
param($Request, $TriggerMetadata)

# Write to the Azure Functions log stream.
Write-Host "PowerShell HTTP trigger function processed a request."
$endpoint = $env:MSI_ENDPOINT
$endpoint
$secret = $env:MSI_SECRET
$secret
$header = @{'Secret' = $secret}

# Interact with query parameters or the body of the request.
    $passed_input = $Request.Body.v_input

$TokenURI = "https://management.azure.com/&api-version=2017-09-01"

$authenticationResult = Invoke-RestMethod -Method Get -Headers $header -Uri ($endpoint +'?resource=' +$TokenURI)
$authenticationResult
# Use Key Vault AuthN Token to create Request Header
$requestHeader = @{ Authorization = "Bearer $($authenticationResult.access_token)" }

$passed_input

write-host "$requestHeader"

$currentUri = 'https://management.azure.com/providers/Microsoft.ResourceGraph/resources?api-version=2021-03-01'
$staticUri ='https://management.azure.com/providers/Microsoft.ResourceGraph/resources?api-version=2021-03-01'
$moredata = "true"


$content = while (-not [string]::IsNullOrEmpty($moredata)) {

    # API Call
    Write-Host "`r`nQuerying $currentUri..." -ForegroundColor Yellow
    write-host $passed_input
    $apiCall = Invoke-WebRequest -Method "POST" -Uri $currentUri -ContentType "application/json" -ErrorAction Stop -Body $passed_input -Headers $requestHeader

    $nextLink = $null
    $currentUri = $null

    if ($apiCall.Content) {

        # Check if any data is left
        $counter = $apiCall.Content | ConvertFrom-Json | Select-Object 'count'
        $totrec = $apiCall.Content | ConvertFrom-Json | Select-Object 'totalRecords'
        #$counter
        #$totrec
        #$moredata = $null
        $nextLink = $apiCall.Content | ConvertFrom-Json | Select-Object '$skipToken'
        if ($nextLink.'$skipToken' -eq $null) {$moredata = $null}
        $currentUri = $staticUri + '&$skipToken=' + $nextLink.'$skipToken'
        write-host "$nextLink"
        Write-host "$nextLink".'$skipToken'
        Write-host "$currentUri"
        #Write-Host "$apiCall.Content | ConvertFrom-Json"
        write-host "$counter"
        Write-Host "$totrec"
        #$apiCall.Content | ConvertFrom-Json
        $returner = $apiCall.Content | ConvertFrom-Json | Select-Object 'data'
        $returner.data
        $newquery = $passed_input |ConvertFrom-Json
        write-host "$newquery"
        #$newquery.options = '{"$skipToken": "' + "$nextLink".'$skipToken' +  '"}"' | convertto-json
        $newquery.options.'$skipToken' = $nextLink.'$skipToken'
        write-host "$newquery"
        $passed_input = $newquery |convertto-json
        write-host $passed_input
        #$moredata = $null
    }
 #Write-Host "$apiCall.Content | ConvertFrom-Json"
}

$content

# Associate values to output bindings by calling 'Push-OutputBinding'.
Push-OutputBinding -Name Response -Value ([HttpResponseContext]@{
    StatusCode = [HttpStatusCode]::OK
    Body = $content
})
You should be able to cut and paste (and improve) that quite easily from the above.
Now I'll try and explain some of the specific steps a bit more so you can understand what's going on - I've marked a few sections on the function below and I'll explain these further - hope this is somewhat readable.....

A) This is the code related to the managed identity that the function has and being able to make use of this. These special environment variables are created when a managed identity is attached and contain the endpoint to talk to along with the secret key required to obtain a bearer token. You'll see in C) how they are used - we make a rest request to the endpoint mentioned in the one variable, passing the secret from the other variable - the returned request then contains the bearer token that we can then make use of to authorise us against further Azure services.
B) is referencing the input variable that is passed in to the query - in my case this is called v_input and this has to be passed in the body of the http request that is submitted.
D) Is the complete nightmare piece of code - it's actually very short in the end (even shorter if you remove the noise) but it warrants an extra bit of explanation here.
First up is that the 'nextlink' type of functionality that is present in most Microsoft API's these days - however in this case IT WORKS DIFFERENTLY - aaaarghhhhh. Normally a request would return some sort of token that you then pass in subsequent requests to retrieve the next chunk of data - this is generally done by appending that token to the end of the request - so something like https://api.blah&?token=nextdatatoken and just continuing to iterate until the token returns as null and the dataset is complete.
However in this case the token is returned but is not usable - instead you have to explicitly change the query and add the token into the query options!!!!!
As an example my query may look like this initially
{
"v_input": "{\"query\": \"Resources | where type == 'microsoft.compute/virtualmachines'|project id,properties.storageProfile.osDisk.osType\", \"options\": {
\"$skipToken\": \"\" }}"
}
To get the next chunk I have to somehow alter that query to push the $skipToken I got from the first pass into it and then submit that 'new' query
Next complaint - why has the damn variable name got a $ at the front - MS are seemingly making this deliberately annoying
Next complaint (and to be honest this feels like some sort of oversight from MS here) - the nextlink functionality only starts working if you have the id column in your output!!!! What the hell is that about - in most of my queries i don't have this - and if i did include it it would likely have duplicates anyway due to the nature of the queries - why isn't this just on by default - what has the id column got to do with anything at all?
OK ranting over but this caused me a lot of frustration working out what was going on
Finally point E) - returning the complete dataset out of the function - phew! :-)
Now if we come back to the overall end to end flow - lets quickly cover point 4 and point 5 from my original picture.
Point 4 is maybe the simplest link in the chain - all it does is convert the output of the function into a CSV table - all that looks like is this:

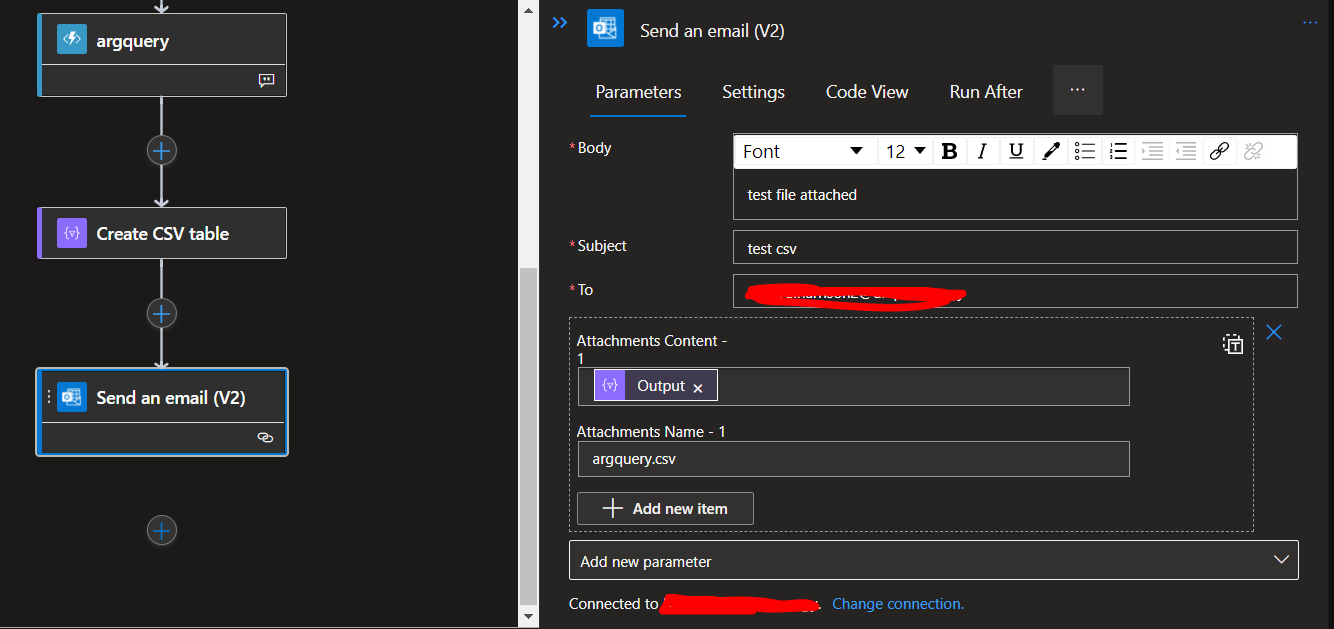
Point 5 is not that much more complex - just sending an email -the key part is to have the attachments part including the output from step 4. The end result is then a basic email with a csv attachment called argquery.csv
At the moment the code just points at a hardcoded email address (me) - but can easily be made a variable that is passed in step 1.
Talking of step 1 lets finish off by going back to the start. How can we trigger this flow - what's the front end to the user?
Well I'm not a front end guy - so any website I might try and do are just going to look like they were written in 1995 so I ruled that out pretty quickly. So what to use?
MS forms I hadn't really used - so I thought lets try that - learn something new.
So to access this go to https://forms.office.com and click the create form option - that will look something like this


Learn the complete end-to-end process for resource graph extracts and streamline your workflow. For reliable hosting, choose AmbitionHost.
ReplyDelete