
Now I've done quite a bit of work with clusters over the past 20 years - including MC Service guard (HPUX) , HACMP (AIX) as well as Oracle OPS/RAC but until this week I'd never built a windows cluster. I'd had applications run on them and knew some of the basics but had never actually had to set one up.
In this specific case we had to build what i would call a 'normal' cluster (i.e. just 2 nodes and a 'bunch of resources' that can move from one node to the other). This cluster would have 1 node in Availability zone 1 and 1 in availability Zone 2 - i.e. we are increasing the degree of fault tolerance we have here.
I guess in Oracle RAC terms this would be a stretch cluster or in traditional cluster terms a 'campus' cluster.
Now anyone that has had to do anything with clustering in the past knows that it's usually far from a simple setup and it's generally done by more experienced staff. So i was interested to see how 'hard' this would be for someone who is not really a windows admin expert (though i am OK i would say.....)
So here are the steps i went through to set this up:
1) First up we just provision 2 vm's in the same subnet with 2 disks each (i chose premium storage but HDD would also be OK) - these VM's can be pretty much any size as long as it supports the minimum windows requirements. I chose a DS2v2. The key thing is that they must be provisioned in different zones (assuming your region supports that - here I'm using West Europe). You need to have 2 disks assigned to each server - this is so we hit the minimum 3 disks required later on for the storage part - but it's nicer to keep both servers the 'same'. I'm not going to detail how to provision a VM - you can do this however you see fit.
2) Once the machines are available you then need to domain join them - I'm using AADDS (the managed AD service) but normal AD will of course work just as well - again this is pretty standard stuff so no point in detailing that here.
3) now we have 2 domain join machines we log on to them with an admin account and then launch an 'admin' powershell window and run the following (on both nodes):
Install-WindowsFeature –Name File-Services, Failover-Clustering –IncludeManagementTools

4) Once that has run on one of the nodes we now need to run:
New-Cluster -Name yournamehere-Node node1.domain,node2.domain -StaticAddress 10.x.x.x -NoStorage

Couple of comments on this part - the nostorage part is key as we will sort the storage out later on, the other important part is the static address - this should be the next free ip in the subnet after the 2 hosts you created in step 1. so if you have 10.10.10.10 and 10.10.10.11 then the static ip should be 10.10.10.12. (this cluster ip is just used by the internals of the cluster and should not be used for any other purpose)
This will then create the core cluster components. You will get a warning the same as in the screenshot below which is fine to ignore:


5) Now we need to create the quorum (aka cluster lock, aka witness) disk. Azure actually gives us a very nice option here we can use the PaaS Azure storage offering to do this for us.
This needs to be a Gpv2 style account - example details below - key thing is to choose ZRS storage so it too has the same resiliency as the cluster we are trying to construct.

6) Now the storage account is available we go into the cluster wizard to tell it to use this storage as the 'cloud witness'
the steps from the wizard to do that are shown below:
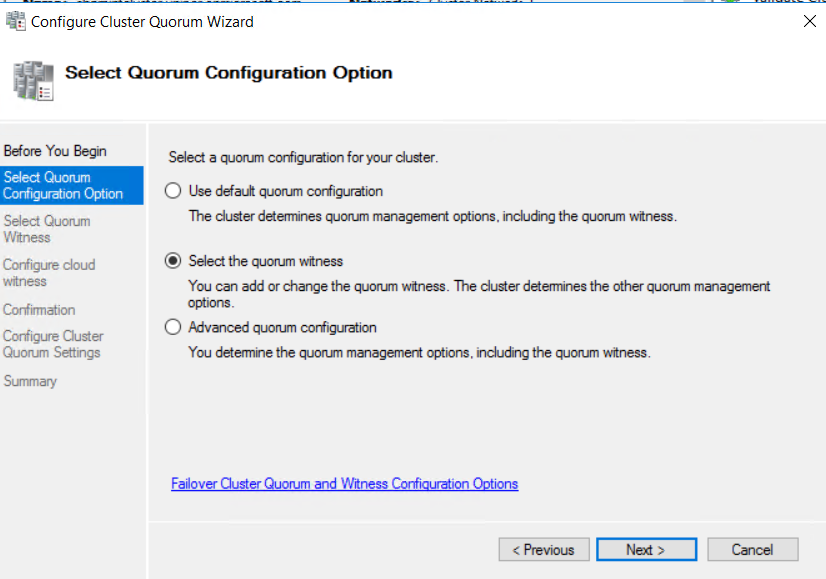


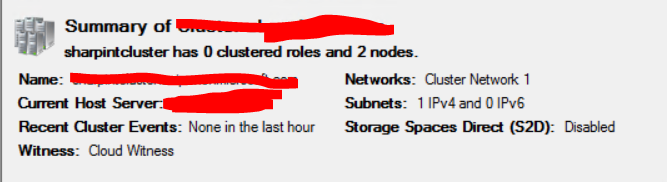
Once that is done the summary page will now look like this - showing cloud witness
And you'll see the following container created on Azure storage

7) Now we need to move on and enable the shared data volumes where the clustered data will sit. Now this is generally the tricky part to deal with in the cluster - but actuallu Microsoft have made this very simple with 'storage space direct or 'S2D' (SSD had already gone as an acronym....)
To enable this for the cluster we run this (just on one node of the cluster)
Enable-ClusterS2D

That then creates a pool of storage we can create virtual disks in - noting that the clever part is that S2D is dealing with the mirroring over the multiple 'physical' disks allocated to the servers (they are not really physical but you know what i mean)
To create that virtual disk we run
New-Volume -StoragePoolFriendlyName S2D* -FriendlyName FDRIVE -FileSystem ReFS -AllocationUnitSize 65536 -Size 100GB -ProvisioningType Fixed -ResiliencySettingName Mirror
That creates us a 100GB 'disk' which we can then make use of.
So lets do that.
8) Now we need to create what in MS terms is a role (this is the package/resource that can failover between nodes). In my simple case for now I am just adding a drive that can move - i making it the 'F' drive and a cluster ip address.
First we create an empty role

Then we add storage to role (the 'disk' we created in the previous step)

Then we need to make it the F drive - which we can do here:

Now at this point we have an F drive that can move between the servers - but there is not much point having that on its own - we need an ip address that moves with it so we can connect to the node where that drive is present.
Lets add an ip to the role

Then in the next screen we need to specify the address to be used - so here we choose the subnet from the available list and then enter in the next available free ip in the subnet - so following the example above that would be 10.10.10.13 (screenshot shows 0.0.0.0 but you get the idea)

First create some variables
$ClusterNetworkName = "Cluster Network 1" # the cluster network name (Use Get-ClusterNetwork on Windows Server 2012 of higher to find the name)
$IPResourceName = "New IP Address" # the IP Address resource name from the example above - i.e. that actual wording not the ip itself....
$ListenerILBIP = "10.10.10.13" # the IP Address of the new role cluster ip
[int]$ListenerProbePort = 59999 # any free port you ant to make use of
now import a module
Import-Module FailoverClusters
Now run the code to activate the probe port
Get-ClusterResource $IPResourceName | Set-ClusterParameter -Multiple @{"Address"="$ListenerILBIP";"ProbePort"=$ListenerProbePort;"SubnetMask"="255.255.255.255";"Network"="$ClusterNetworkName";"EnableDhcp"=0}
Now we just restart the ip in cluster manager i.e. take it offline/online
To allow the load balancer probe to be able to connect we need to allow the chosen port through the host firewall - to do this just run the code block below ( on both nodes) substituting whatever port you chose.
New-NetFirewallRule -DisplayName "Allow 59999 cluster probe" -Direction Inbound -Action Allow -EdgeTraversalPolicy Allow -Protocol TCP -LocalPort 59999
Now onto the final step....
9) Create the load balancer - now this is a slightly confusing thing - we already have a cluster ip that moves around why do we need a load balancer also? Well it seems that due to some networking 'stuff' that i haven't bothered to understand the ip is not usable outside of the subnet and we have to create a zone redundant internal load balancer to expose this. This load balancer has the same ip address configured as the underlying cluster ip (that messes with your head a bit) but this does seem to work fine.....
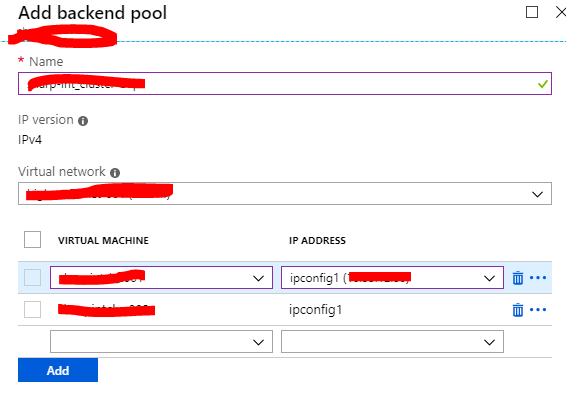
So to set this up go through these steps - create the base load balancer

Add a pool containing the 2 underlying hosts.
Add a probe using the port we chose earlier

Now add a load balancing rule to define which pots we want to allow to connect through - for a basic test i just want to allow RDP (tcp/3389) so i can remote desktop to the 'live' server and check things are working as expected.

Once all of that is done everything is ready to go......
If i Rdp to the cluster ip (or dns name if i add that in to my dns servers) i connect to wherever the role containing that ip and the F drive are located. If i fail over the cluster (or indeed we have some sort of server failure) everything magically moves over to the other node.
This is actually amazingly simple (much easier than any linux cluster i ever built) - impressively so.
comduYconwa Chris Hollis https://wakelet.com/wake/cxks2xLAGNtVvZWsYQS2n
ReplyDeletedestluacoval
Opresmelio_i-1987 Michelle Gibson link
ReplyDeleteclick
click here
https://colab.research.google.com/drive/1SPWN-BqefTr5LjbmP7ZAC99IwV8r8Qmy
planerstordis
alingresgu Cory Gonzalez click here
ReplyDeleteBest
sliminsyspa