
So I'm back to clustering again - as mentioned in previous blogs I've done this a lot on the past with HPUX/AIX/redhat/windows/oracle in various different forms but never with SLES and never with Linux in Azure until this past week.
So here is my write up - hopefully this is useful to others - I couldn't find a good bit of documentation that really covered a complete cluster case of what I would call a 'typical' traditional cluster - i.e. and ip address and a filesystem move from one node to another in the event of machine failure (there are still some use cases where this is relevant).
The following Microsoft note got me a lot of the way there (https://docs.microsoft.com/en-us/azure/virtual-machines/workloads/sap/high-availability-guide-suse-nfs) but there were some things that didn't work.
So to help me in future (and to hopefully help others too) here is how I built a SLES zone redundant cluster in Azure.
First up a basic picture of what it will build (don't judge my drawing skills)

So we end up with 3 machines here - the 2 'cluster' nodes - which can host the 'application' service and a 3rd note to act as a 'split brain device' (or quorum disk or cluster lock disk - whatever you want to call that). In windows clustering this device has been replaced with azure blob storage (the so called cloud witness) but that's not directly possible here (well I say that - there is an option of using a fencing agent but that has some limitations so was discounted)
I split the machines so that the 2 main cluster nodes were in azure zone 1 and 2 (in west Europe) with the split brain device being located in Zone 3. This is then increasing our availability to even better than a normal availability set.
First up we'll just deal with node 3 as that is very simple (it just needs to be an iscsi target reachable from the other 2 servers) and we can just get it out of the way. All this needs to be is a very small server (B2ms was fine for me) - it probably could be any os that supports creating iSCSI devices but to keep things SuSE I provisioned a SLES15sp1 image from the marketplace
I provision that on a private address only set with a static reservation (no public ip's here - though of course you could choose to do that should you wish....) It doesn't need any data disk and pretty much everything is just default settings.
Once that is up and running we ssh on to the server and then run the following steps:
1) Sort out the software packages and enable some iscsi stuff
zypper update
zypper remove lio-utils
python-rtslib python-configshell targetcli
zypper install targetcli-fb
dbus-1-python
systemctl enable targetcli
systemctl start targetcli
2) Create the iscsi device (i just do this on the os disk) - now my system I'm installing is called 'hub' - so any instances of that name you could replace with whatever you want to call it. My two cluster nodes are called simply node01 and node02 - so again replace those names with the name of your choosing
mkdir /sbd
targetcli backstores/fileio
create sbdhub /sbd/sbdhub 50M write_back=false
targetcli iscsi/ create
iqn.2006-04.hub.local:hub
targetcli
iscsi/iqn.2006-04.hub.local:hub/tpg1/luns/ create /backstores/fileio/sbdhub
targetcli
iscsi/iqn.2006-04.hub.local:hub/tpg1/acls/ create
iqn.2006-04.node01.local:node01
targetcli
iscsi/iqn.2006-04.hub.local:hub/tpg1/acls/ create
iqn.2006-04.node02.local:node02
targetcli saveconfig
And that's it - nothing else to do on this server at all - we just created an iscsi device for later use for split brain detection in the cluster.
Right now on to the more complicated cluster nodes.
We start off in pretty much the same way - I just order 2 VM's from the portal - this time however making sure to choose the SLES 15sp1 image for SAP (as this includes the HA packages required for clustering even though I have no intention of using SAP)
node01 i order in zone 1 and node02 in zone 2 (original huh). Each machine I add 1 additional data disk to - in my case 1TB each - you may require more or less than that - but just make sure they are the same size.
Once the azure platform has done it's thing i then log on to node01 and run the following steps
1) attach to the iscsi device we created on the 3rd node in zone 3
systemctl enable iscsid
systemctl enable iscsi
systemctl enable sbd
2) in /etc/iscsi/initiatorname.iscsi file - set name to
match name from sbd node for node1
## may reject this initiator. The InitiatorName must be unique
## for each iSCSI initiator. Do NOT duplicate iSCSI InitiatorNames.
InitiatorName=iqn.2006-04.node01.local:node01
3) restart iscsi to pick that up
systemctl restart iscsid
systemctl restart iscsi
4) discover that device from the 3rd node
iscsiadm -m discovery --type=st
--portal=10.10.10.76:3260
iscsiadm -m node -T iqn.2006-04.hub.local:hub
--login --portal=10.10.10.76:3260
iscsiadm -m node -p 10.10.10.76:3260 --op=update
--name=node.startup --value=automatic
5) Now when we run lsscsi we will see an iscsi device (/dev/sdc in the output below)
# lsscsi
[1:0:0:0]
cd/dvd Msft Virtual CD/ROM 1.0
/dev/sr0
[2:0:0:0]
disk Msft Virtual Disk 1.0
/dev/sda
[3:0:1:0]
disk Msft Virtual Disk 1.0
/dev/sdb
[6:0:0:0]
disk LIO-ORG sbdhub 4.0
/dev/sdc
6) If we then find the full path to that using this command (pick the
one starting scsi-3)
ls -l /dev/disk/by-id/scsi-* | grep sdc
/dev/disk/by-id/scsi-3600140591120716e08e4ad4b3b5318c0
7) We can then create the sbd device
sbd -d
/dev/disk/by-id/scsi-3600140591120716e08e4ad4b3b5318c0 -1 60 -4 120 create
8) And add that device to the config file
vi /etc/sysconfig/sbd
grep scsi /etc/sysconfig/sbd
SBD_DEVICE="/dev/disk/by-id/scsi-3600140522db15c1728d4b01a2e2204ed"
9) now we enable the 'softdog' module - honestly no clue what this is for but the MS note said to do it...…..
echo softdog | sudo tee
/etc/modules-load.d/softdog.conf
modprobe -v softdog
10) now get all the packages up to date
zypper update (then reboot)
11) Now a couple of config changes
vi
/etc/systemd/system.conf
look for this value and set to 4096
defaulttasksmax=4096
then reload the daemon
systemctl daemon-reload
add
vm.dirty_bytes = 629145600
vm.dirty_background_bytes = 314572800
to /etc/sysctl.conf
Then stop the azure cloud networking thing kicking in as it messes stuff up
vi /etc/sysconfig/network/ifcfg-eth0 (set
cloud_netconfig_manage to no)
12) Now install some python stuff
zypper ar https://download.opensuse.org/repositories/openSUSE:/Backports:/SLE-15/standard/ SLE15-PackageHub
zypper in python3-azure-sdk
14) Now make sure names resolution is working by adding entries to /etc/hosts on the server
10.10.10.69 node01
10.10.10.70 node02
15) Now we can initialize the cluster (albeit with one node at the moment) - pretty much defaults for everything - output below is fairly self explanatory.
ha-cluster-init -u
WARNING: chronyd.service is not configured to start
at system boot.
Do you want to continue anyway (y/n)? y
Generating
SSH key
Configuring
csync2
Generating
csync2 shared key (this may take a while)...done
csync2
checking files...done
Configure Corosync (unicast):
This will
configure the cluster messaging layer.
You will need
to specify a
network address over which to communicate (default
is eth0's
network, but you can use the network address of any
active
interface).
Address for
ring0 [10.10.10.69]
Port for
ring0 [5405]
Configure SBD:
If you have
shared storage, for example a SAN or iSCSI target,
you can use
it avoid split-brain scenarios by configuring SBD.
This
requires a 1 MB partition, accessible to all nodes in the
cluster. The device path must be
persistent and consistent
across all
nodes in the cluster, so /dev/disk/by-id/* devices
are a good
choice. Note that all data on the
partition you
specify here
will be destroyed.
Do you wish to use SBD (y/n)? y
SBD is already configured to use
/dev/disk/by-id/scsi-3600140522db15c1728d4b01a2e2204ed - overwrite (y/n)? n
Hawk cluster
interface is now running. To see cluster status, open:
Log in with
username 'hacluster', password 'linux'
WARNING: You should change the hacluster password to
something more secure!
Waiting for
cluster........done
Loading
initial cluster configuration
Configure Administration IP Address:
Optionally
configure an administration virtual IP
address. The
purpose of this IP address is to
provide a
single IP that can be used to interact
with the
cluster, rather than using the IP address
of any
specific cluster node.
Do you wish to configure a virtual IP address (y/n)?
n
Done (log
saved to /var/log/ha-cluster-bootstrap.log)
Most of this is a repeat so I'll skip a lot of the explanation
systemctl enable iscsid
systemctl enable iscsi
systemctl enable sbd
vi
/etc/iscsi/initiatorname.iscsi
grep Init
/etc/iscsi/initiatorname.iscsi
## Default iSCSI Initiatorname.
## If you change the InitiatorName, existing access
control lists
## may reject this initiator. The InitiatorName must be unique
## for each iSCSI initiator. Do NOT duplicate iSCSI InitiatorNames.
InitiatorName=iqn.2006-04.node02.local:node02
systemctl restart iscsid
systemctl restart iscsi
iscsiadm -m discovery --type=st
--portal=10.10.10.76:3260
iscsiadm -m node -T iqn.2006-04.hub.local:hub
--login --portal=10.10.10.76:3260
iscsiadm -m node -p 10.10.10.76:3260 --op=update
--name=node.startup --value=automatic
# lsscsi
[1:0:0:0]
cd/dvd Msft Virtual CD/ROM 1.0
/dev/sr0
[2:0:0:0]
disk Msft Virtual Disk 1.0
/dev/sda
[3:0:1:0]
disk Msft Virtual Disk 1.0
/dev/sdb
[6:0:0:0]
disk LIO-ORG sbdhub 4.0
/dev/sdc
/dev/disk/by-id/scsi-3600140591120716e08e4ad4b3b5318c0
(same as on node 1)
dont recreate sbd device again - just enter into
config
vi /etc/sysconfig/sbd
hubclus-1:~ # grep scsi /etc/sysconfig/sbd
SBD_DEVICE="/dev/disk/by-id/scsi-3600140522db15c1728d4b01a2e2204ed"
echo softdog | sudo tee
/etc/modules-load.d/softdog.conf
modprobe -v softdog
zypper update
vi
/etc/systemd/system.conf
defaulttasksmax=4096
systemctl daemon-reload
add
vm.dirty_bytes = 629145600
vm.dirty_background_bytes = 314572800
to /etc/sysctl.conf
vi /etc/sysconfig/network/ifcfg-eth0 (set
cloud_netconfig_manage to no)
zypper ar https://download.opensuse.org/repositories/openSUSE:/Backports:/SLE-15/standard/ SLE15-PackageHub
zypper in python3-azure-sdk
update hosts
10.10.10.69 node01
10.10.10.70 node02
Now on both nodes we need to generate ssh keys to allow transparent login
ssh-keygen (default everything when prompted)
then copy the content of the public key into the authorized_keys file on the opposite node - then you can ssh with no password to the opposite node (I'm assuming if you are contemplating building a cluster you'll know the basics of how to set this up to be honest.......)
Now we join the second node to the cluster
ha-cluster-join
WARNING: chronyd.service is not configured to start
at system boot.
Do you want to continue anyway (y/n)? y
Join This
Node to Cluster:
You will be
asked for the IP address of an existing node, from which
configuration will be copied. If
you have not already configured
passwordless
ssh between nodes, you will be prompted for the root
password of
the existing node.
IP address
or hostname of existing node (e.g.: 192.168.1.1) []node01
Retrieving
SSH keys - This may prompt for root@node01:
/root/.ssh/id_rsa already exists - overwrite (y/n)?
n
No new SSH
keys installed
Configuring
csync2...done
Merging
known_hosts
Probing for
new partitions...done
Address for
ring0 [10.10.10.70]
Hawk cluster
interface is now running. To see cluster status, open:
Log in with
username 'hacluster', password 'linux'
WARNING: You should change the hacluster password to
something more secure!
Waiting for
cluster....done
Reloading
cluster configuration...Password:
Password:
done
Done (log
saved to /var/log/ha-cluster-bootstrap.log)
And at this point we have a basic cluster in place - it's not really got anything useful in it though at all - so now lets add in that.
The following steps need to be done on both nodes (showing this in red......)
1) update corosync config - just these 2 values need updating and the service restarting
update /etc/corosync/corosync.conf
file
token: 30000
consensus: 36000
service corosync restart
2) Then we install socat - this we'll use to host a 'dummy' service running on a port that we can use for the loadbalancer probe we'll create later on
zypper in socat
3) Now we prep that 1TB disk I added to be used by drbd (I find this for some reason the most impossible sequence of 4 letters to type - I get it wrong at least 50% of the time - too long working with db's I think)
Make sure you run this against the 1TB device and not the iscsi device...…. (sdd in my case where iscsi was sdc)
# fdisk /dev/sdd
Welcome to fdisk (util-linux 2.33.1).
Changes will remain in memory only,
until you decide to write them.
Be careful before using the write
command.
Device does not contain a recognized
partition table.
Created a new DOS disklabel with disk
identifier 0x207d70aa.
Command (m for help): n
Partition type
p primary (0 primary, 0
extended, 4 free)
e extended (container for
logical partitions)
Select (default p): p
Partition number (1-4, default 1):
First sector (2048-2147483647, default
2048):
Last sector, +/-sectors or
+/-size{K,M,G,T,P} (2048-2147483647, default 2147483647):
Created a new partition 1 of type
'Linux' and of size 1024 GiB.
Command (m for help): w
The partition table has been altered.
Calling ioctl() to re-read partition
table.
Syncing disks.
Now we want to initialize this disk with lvm (I don't think you need to use LVM to be honest - but I just prefer to work using it
pvcreate /dev/sdd1
vgcreate /dev/netahub /dev/sdd1
lvcreate --name esis --size 128G
/dev/netahub
now we have a 128GB block device that we will use with drbd
(As a side note i had never even heard of drbd before i started building this - it essentially does block replication - doesnt have to be used in a cluster but i guess thats the main use case)
So lets set that part up
1) set content of vi
/etc/drbd.d/global_common.conf to
global {
usage-count no;
}
common {
handlers {
fence-peer
"/usr/lib/drbd/crm-fence-peer.sh";
after-resync-target
"/usr/lib/drbd/crm-unfence-peer.sh";
split-brain
"/usr/lib/drbd/notify-split-brain.sh root";
pri-lost-after-sb
"/usr/lib/drbd/notify-pri-lost-after-sb.sh;
/usr/lib/drbd/notify-emergency-reboot.sh; echo b > /proc/sysrq-trigger ;
reboot -f";
}
startup {
wfc-timeout 0;
}
options {
}
disk {
md-flushes yes;
disk-flushes yes;
c-plan-ahead 1;
c-min-rate 100M;
c-fill-target 20M;
c-max-rate 4G;
}
net {
after-sb-0pri
discard-younger-primary;
after-sb-1pri discard-secondary;
after-sb-2pri call-pri-lost-after-sb;
protocol C;
tcp-cork yes;
max-buffers 20000;
max-epoch-size 20000;
sndbuf-size 0;
rcvbuf-size 0;
}
}
2) Now we create a drbd config file for our lvm device - this file is created in /etc/drbd.d and in my case is named hub-esis.res (the name of the file has to match the name in the first line of the file). Note that we name the virtual device that will be created here as /dev/drbd0
resource hub-esis {
protocol C;
disk {
on-io-error detach;
}
on node01{
address 10.10.10.69:7790;
device /dev/drbd0;
disk /dev/netahub/esis;
meta-disk internal;
}
on node02{
address 10.10.10.70:7790;
device /dev/drbd0;
disk /dev/netahub/esis;
meta-disk internal;
}
}
3) Now we create the actual device
drbdadm create-md hub-esis
drbdadm up hub-esis
drbdadm new-current-uuid
--clear-bitmap hub-esisdrbdadm primary --force hub-esis
Now we bring it up on the second node also
drbdadm create-md hub-esis
drbdadm up hub-esis
drbdadm down hub-esis
drbdadm up hub-esis
Now we go back to primary and force the 2 devices to sync
drbdsetup wait-sync-resource hub-esis
mkfs.xfs /dev/drbd0
Right at this point we can now start adding stuff into the actual cluster config and get something actually useful running
1) we set a global setting for the cluster and go into maintenance mode (so no failovers start happening)
crm configure property maintenance-mode=true
crm configure rsc_defaults resource-stickiness="200"
2) Lets add the drbd device to the cluster config - the first command defines the device and the second defines the master slave relationship
crm configure primitive drbd_hub-esis
\
ocf:linbit:drbd \
params drbd_resource=hub-esis \
op monitor interval="15" role="Master" \
op monitor interval="30" role="Slave"
notify="true"
crm configure ms ms-drbd_hub-esis
drbd_hub-esis \
meta master-max="1" master-node-max="1"
clone-max="2" \
clone-node-max="1" notify="true"
interleave="true"
crm configure primitive fs_esis \
ocf:heartbeat:Filesystem \
params device=/dev/drbd0 \
directory=/esis \
fstype=xfs \
op monitor interval="10s"
crm configure primitive vip_hub \
IPaddr2 \
params ip=10.10.10.68 cidr_netmask=28 nic=eth0 op monitor interval=10
timeout=20
crm configure primitive probeport
anything \
params binfile="/usr/bin/socat" cmdline_options="-U
TCP-LISTEN:55555,backlog=10,fork,reuseaddr /dev/null" \
op monitor timeout=20s interval=10 depth=0
crm configure group hub \
fs_esis probeport vip_hub
crm configure order o-drbd_before_hub
mandatory: \
ms-drbd_hub-esis:promote hub:start
crm configure colocation
col-hub_on_drbd mandatory: \
hub ms-drbd_hub-esis:Master
crm configure property maintenance-mode=false
At this point the cluster should be up and running and all healthy - (if you have any warning messages from crm status you can clean them up with "crm resource cleanup" - I found this was sometimes essential as if it gets in a sort of funny state it will refuse to run on the other node - this command clears up and previous error messages and sets the state as OK)
You'll find it you just shutdown a node the cluster package of drbd/vip/probeport/filesystem will very rapidly (just few secs for me) switch to the other node and everything works great.
However there is one more thing to do in the portal and that is to create a load balancer - this is needed as the vip we created via the cluster is not known to azure - so you can't actually get to that ip outside of the servers. The load balancer we will create has the same vip as the cluster ip (very confusing i know - but it works this way for windows cluster too). The loadbalancer will be looking for something running on port 55555 (the dummy service thing we created) - if it finds it it sends all the traffic there. So when that service moves so does all the traffic the load balancer is sending.
So in the load balancer screen be sure to choose a standard load balancer (required to use across zones) and set it something like this (ignore error as its just beause i didnt choose vnet etc first)


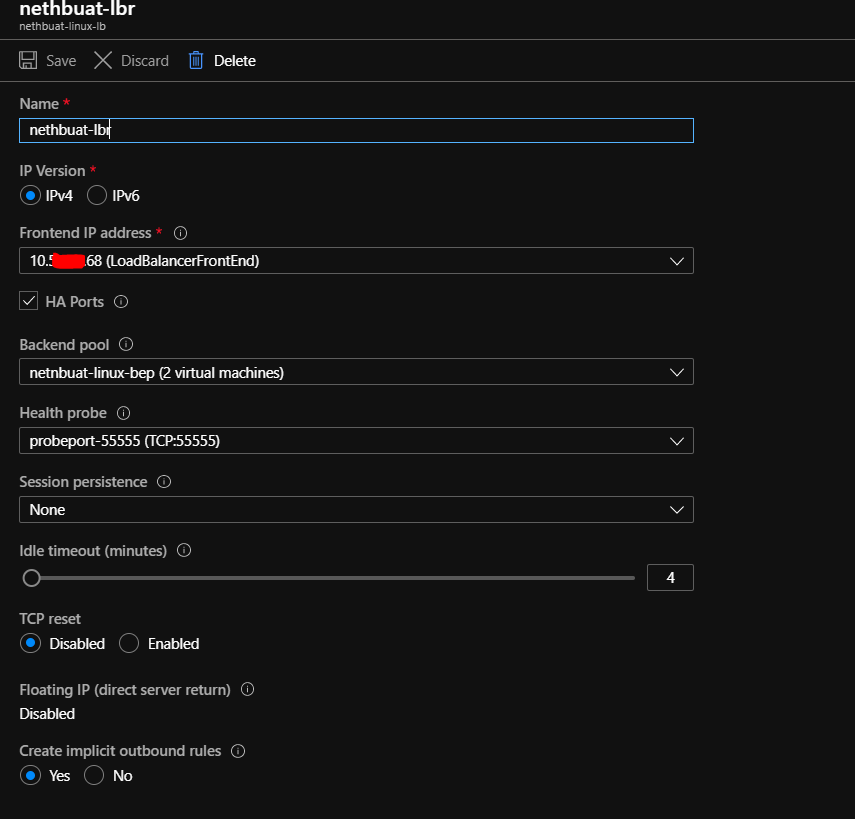
And that's it done - as a simple test you should now be able to ssh to the cluster ip from your laptop/desktop and you'll be routed to the host where the app currently is. If you kill the first node and then try and connect again with ssh you'll see you end up on the other node like magic
There you have it linux cluster in Azure across availability zones - enjoy........
As a small aside - the website that is mentioned during cluster creation is actually quite nice as a visual overview but also as a management console - see example screenshot from another test cluster below

Comments
Post a Comment